DoorDars-SMC: Transforming Education
Coding and Robotics
Empowering Young Minds Through Coding and Robotics
At Doordars-SMC, we believe in unlocking the potential of young innovators through engaging, hands-on Coding and Robotics activities. Tailored for children aged 10-16, our programs introduce primary and secondary school students to the exciting world of STEM/STEAM education. With a focus on creativity, problem-solving, and real-world applications, we aim to inspire the next generation of engineers, programmers, and thinkers.
Why Coding and Robotics?
Enhance Problem-Solving Skills: Students learn to break down complex problems and develop solutions using logical reasoning.
Build Creativity: Coding and robotics provide a platform for young minds to innovate and create.
Real-World Applications: Hands-on activities connect theoretical concepts to practical scenarios, preparing students for future technological challenges.
21st-Century Skills: Empower children with skills like programming, engineering, and teamwork that are vital in the modern world.
What We Offer
Robotics Projects: Build and program robots to perform tasks, from navigating mazes to completing challenges.
Coding for All Levels: Start with block-based programming like Scratch and progress to Python and Arduino IDE.
Sensor Integration: Learn to use sensors like ultrasonic, infrared, and temperature sensors in innovative projects.
AI and Machine Learning Basics: An introduction to artificial intelligence concepts through real-world projects.
Team Competitions: Participate in coding and robotics challenges to foster teamwork and a competitive spirit.
Sample Activities
Beginner Coding: Create interactive stories and games using Scratch.
Robot Building: Assemble a robot and program it to follow a line or avoid obstacles.
IoT Projects: Connect devices like Raspberry Pi and Arduino to sensors for smart home projects.
AI Projects: Train basic models to predict weather or recognize objects using camera modules.
How It Works
Workshops and Camps: Intensive sessions at schools or community centers.
After-School Programs: Weekly classes to steadily build skills.
DIY Kits: Take-home kits with instructions to experiment and learn independently.
STEM/STEAM Education for All
We are committed to making STEM/STEAM education accessible and inclusive for every student. By combining Science, Technology, Engineering, Arts, and Mathematics, we help students discover how diverse disciplines work together to solve complex problems.
Join Us!
Discover the endless possibilities of coding and robotics with Doordars-SMC! Whether you’re a beginner or an enthusiast, we have a program for you. Let’s build the future together!
Learn More: Contact us to inquire about our programs.
Download: Our Monthly Newsletter
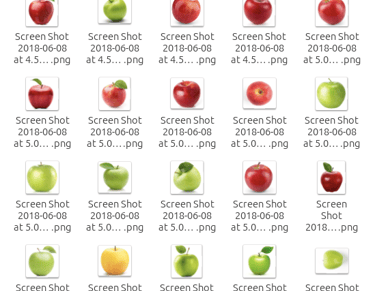
Fruit Classification


#----------------------------
#connecting drive with colab
#----------------------------
from google.colab import drive
drive.mount('/content/drive')
# Follow the instructions for uploading drive and setting permissions.
#
#-------------------------------
import os
import numpy as np
from PIL import Image
from sklearn.model_selection import train_test_split
import tensorflow as tf
from tensorflow.keras.models import Sequential
from tensorflow.keras.layers import Conv2D, MaxPooling2D, Flatten, Dense
# -----------------------------------------
# STEP 1: SET PARAMETERS
# -----------------------------------------
data_dir = "/content/drive/MyDrive/FruitsDataSet" # Path to your main dataset folder
!pwd
img_height = 64
img_width = 64
# Lists to store image data and labels
images = []
labels = []
# Optional: list subfolders (fruit classes) explicitly, or get them automatically
fruit_classes = [
folder for folder in os.listdir(data_dir)
if os.path.isdir(os.path.join(data_dir, folder))
# and not folder.startswith('.') # uncomment if you have hidden/system folders
]
# -----------------------------------------
# STEP 2: LOAD & PREPROCESS IMAGES
# -----------------------------------------
for class_name in fruit_classes:
class_folder = os.path.join(data_dir, class_name)
# Go through each image in the class folder
for img_file in os.listdir(class_folder):
# Only process valid image formats
if img_file.lower().endswith(('.png', '.jpg', '.jpeg')):
img_path = os.path.join(class_folder, img_file)
try:
# 1. Open the image
img = Image.open(img_path)
# 2. Convert to RGB (3 channels) to ensure uniform shape
img = img.convert("RGB")
# 3. Resize to a consistent size (64x64)
img = img.resize((img_width, img_height))
# 4. Convert the image to a NumPy array
img_array = np.array(img) # shape => (64, 64, 3)
# Store the processed image and the corresponding label
images.append(img_array)
labels.append(class_name)
except Exception as e:
print(f"Error loading {img_path}: {e}")
# Convert the lists to NumPy arrays
images = np.array(images, dtype="float32") # shape => (num_images, 64, 64, 3)
labels = np.array(labels)
print("Loaded images shape:", images.shape) # e.g. (NUM_SAMPLES, 64, 64, 3)
print("Loaded labels shape:", labels.shape)
# -----------------------------------------
# STEP 3: NORMALIZE PIXEL VALUES [0,255] -> [0,1]
# -----------------------------------------
images = images / 255.0
# -----------------------------------------
# STEP 4: ENCODE LABELS (STRING TO INT)
# -----------------------------------------
unique_labels = np.unique(labels)
label_to_idx = {label: idx for idx, label in enumerate(unique_labels)}
encoded_labels = np.array([label_to_idx[lbl] for lbl in labels])
# -----------------------------------------
# STEP 5: SPLIT INTO TRAIN & TEST
# -----------------------------------------
X_train, X_test, y_train, y_test = train_test_split(
images,
encoded_labels,
test_size=0.2,
random_state=42
)
print("X_train shape:", X_train.shape)
print("y_train shape:", y_train.shape)
print("X_test shape:", X_test.shape)
print("y_test shape:", y_test.shape)
# -----------------------------------------
# STEP 6: BUILD A SIMPLE CNN MODEL
# -----------------------------------------
num_classes = len(unique_labels)
model = Sequential([
Conv2D(32, (3, 3), activation='relu', input_shape=(img_height, img_width, 3)),
MaxPooling2D((2, 2)),
Conv2D(64, (3, 3), activation='relu'),
MaxPooling2D((2, 2)),
Flatten(),
Dense(128, activation='relu'),
Dense(num_classes, activation='softmax') # one output node per class
])
model.compile(
optimizer='adam',
loss='sparse_categorical_crossentropy',
metrics=['accuracy']
)
model.summary()
# -----------------------------------------
# STEP 7: TRAIN THE MODEL
# -----------------------------------------
history = model.fit(
X_train, y_train,
epochs=10,
validation_split=0.2,
batch_size=32
)
# -----------------------------------------
# STEP 8: EVALUATE THE MODEL
# -----------------------------------------
test_loss, test_acc = model.evaluate(X_test, y_test)
print(f"Test Accuracy: {test_acc*100:.2f}%")
# -----------------------------------------
# STEP 9: Plot
# -----------------------------------------
import matplotlib.pyplot as plt
# (Optional) Plot training results or test predictions
# Plot training & validation accuracy
plt.figure(figsize=(8, 5))
plt.plot(history.history['accuracy'], label='Train Accuracy')
plt.plot(history.history['val_accuracy'], label='Validation Accuracy')
plt.title('Training and Validation Accuracy')
plt.xlabel('Epochs')
plt.ylabel('Accuracy')
plt.legend()
plt.show()
#------------------------
#STEP 10 Random Check
#------------------------
# Pick a random test image
rand_index = random.randint(0, len(X_test)-1)
sample_image = X_test[rand_index]
actual_label_index = y_test[rand_index]
actual_label = unique_labels[actual_label_index]
# Predict
predictions = model.predict(np.expand_dims(sample_image, axis=0))
predicted_label_index = np.argmax(predictions)
predicted_label = unique_labels[predicted_label_index]
plt.imshow(sample_image)
plt.title(f"Actual: {actual_label}, Predicted: {predicted_label}")
plt.show()
